> ## Documentation Index
> Fetch the complete documentation index at: https://docs.rabbitpay.ai/llms.txt
> Use this file to discover all available pages before exploring further.
# Generate Razorpay API Token
> Generate and manage Razorpay API keys for use with RabbitPay.
## Overview
RabbitPay requires **Razorpay API credentials** to securely communicate with your merchant Razorpay account. These credentials authorize RabbitPay to perform key operations on your behalf, including:
* Creating payments and orders
* Verifying payment signatures
* Processing refunds and captures
* Fetching transaction and settlement data
You can either use your **existing Razorpay API keys** or **regenerate a new pair** if you need to rotate credentials or have lost access to the previous secret.
Razorpay displays the **Key Secret only once** at the time of generation. Make sure to copy and store it in a secure location immediately.
## Prerequisites
Before you begin, ensure you have the following:
* An **active Razorpay Business account**
* **Admin access** to the Razorpay Dashboard
* A **verified business website** linked to your Razorpay account
If your business website is not yet verified, complete the KYC and website verification process in Razorpay before generating API keys.
## Step 1: Open Account Settings
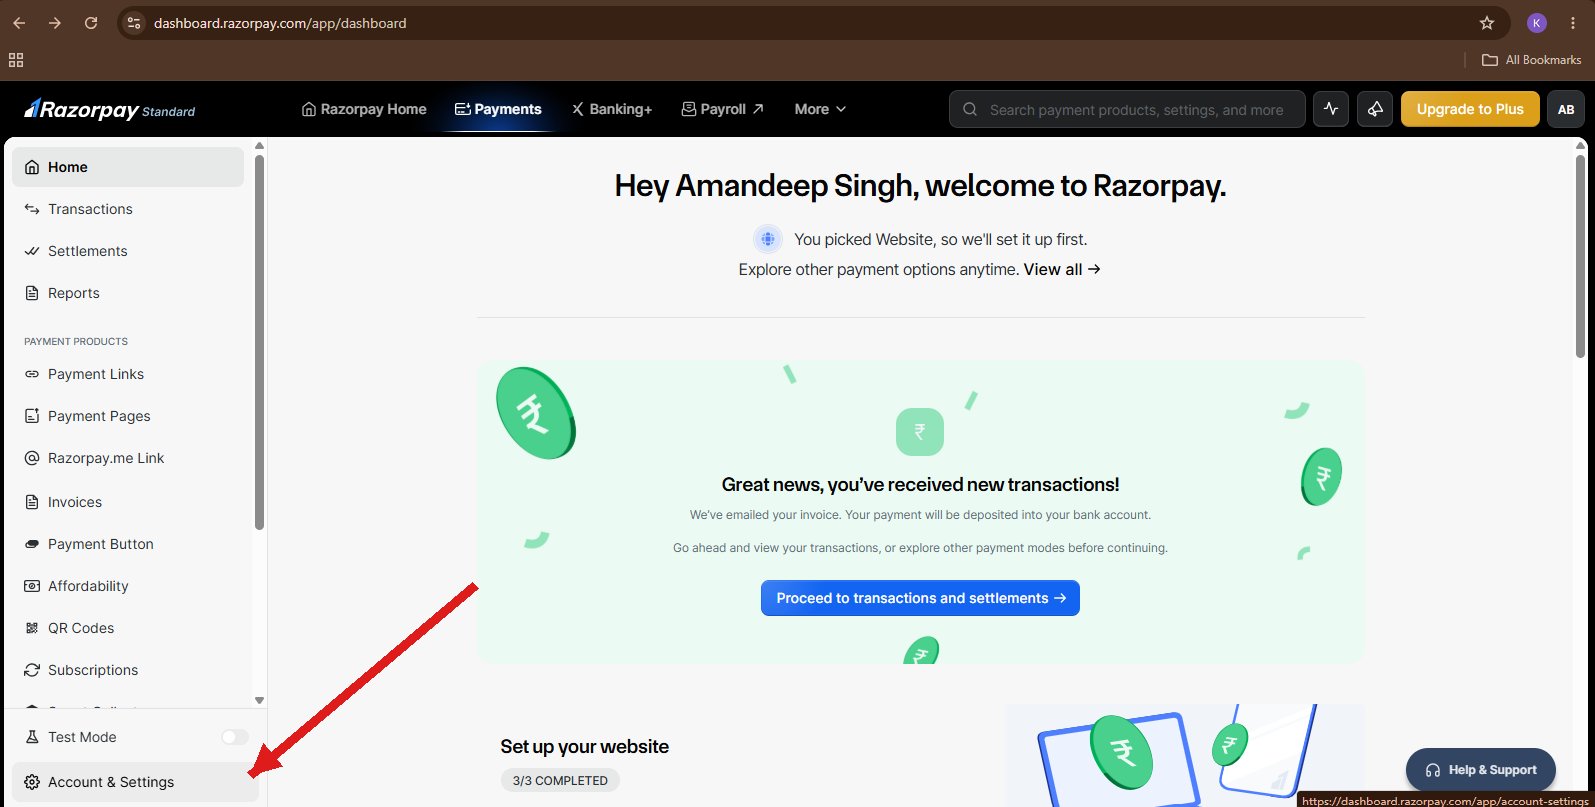
Navigate to your Razorpay Dashboard and open the **Account & Settings** page.
**Navigation path:**
```text theme={null}
Razorpay Dashboard → Account & Settings
```
1. Log in to your [Razorpay Dashboard](https://dashboard.razorpay.com).
2. In the **left sidebar**, scroll to the bottom.
3. Click **Account & Settings**.
 ## Step 2: Open the API Keys Section
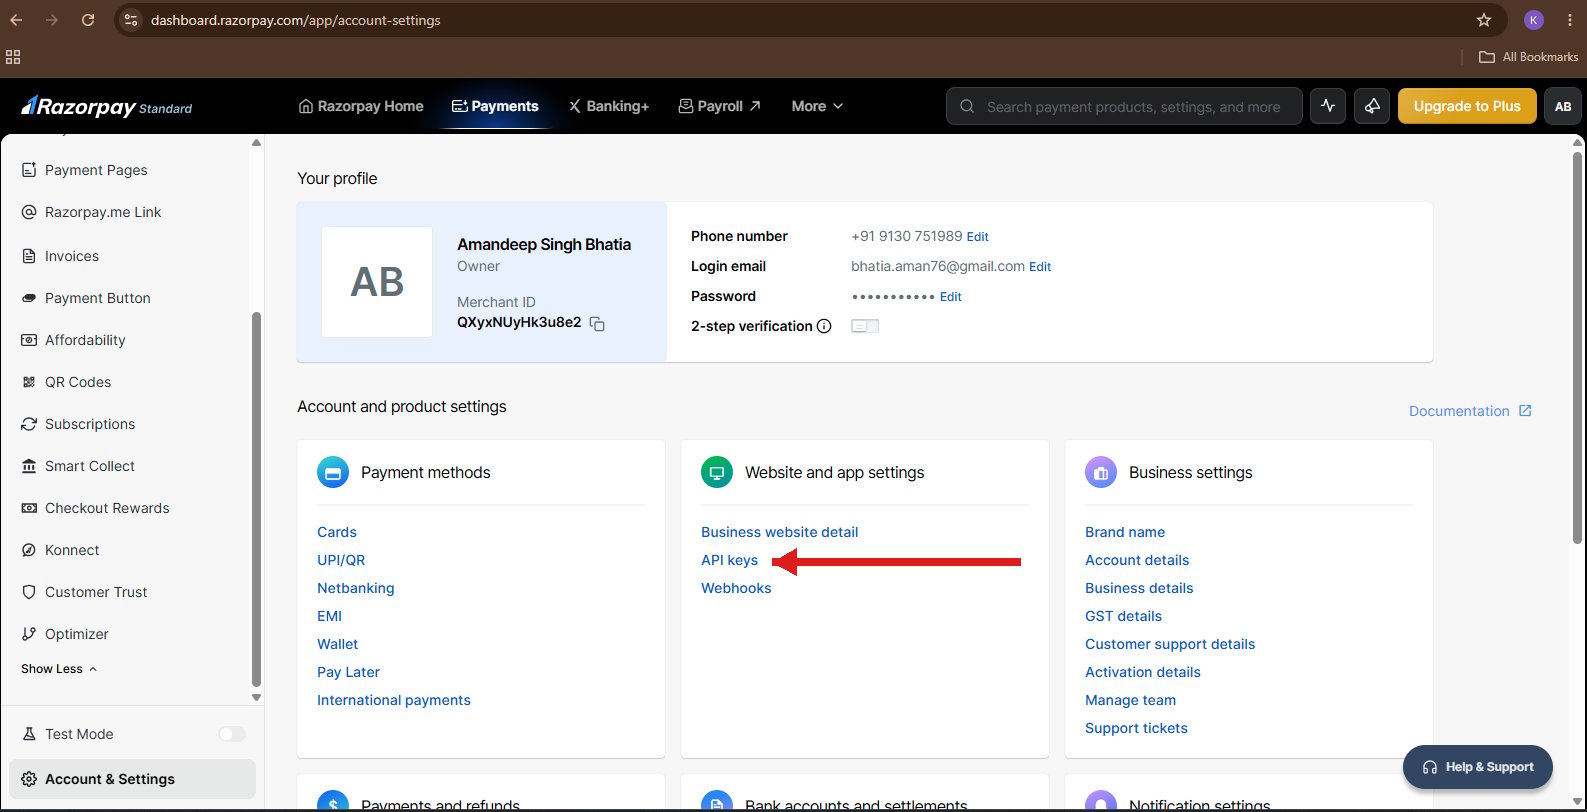
On the **Account & Settings** page, locate the **Website and app settings** card in the middle column and click the **API keys** link.
## Step 2: Open the API Keys Section
On the **Account & Settings** page, locate the **Website and app settings** card in the middle column and click the **API keys** link.
 ## Step 3: Access API Keys & Integration
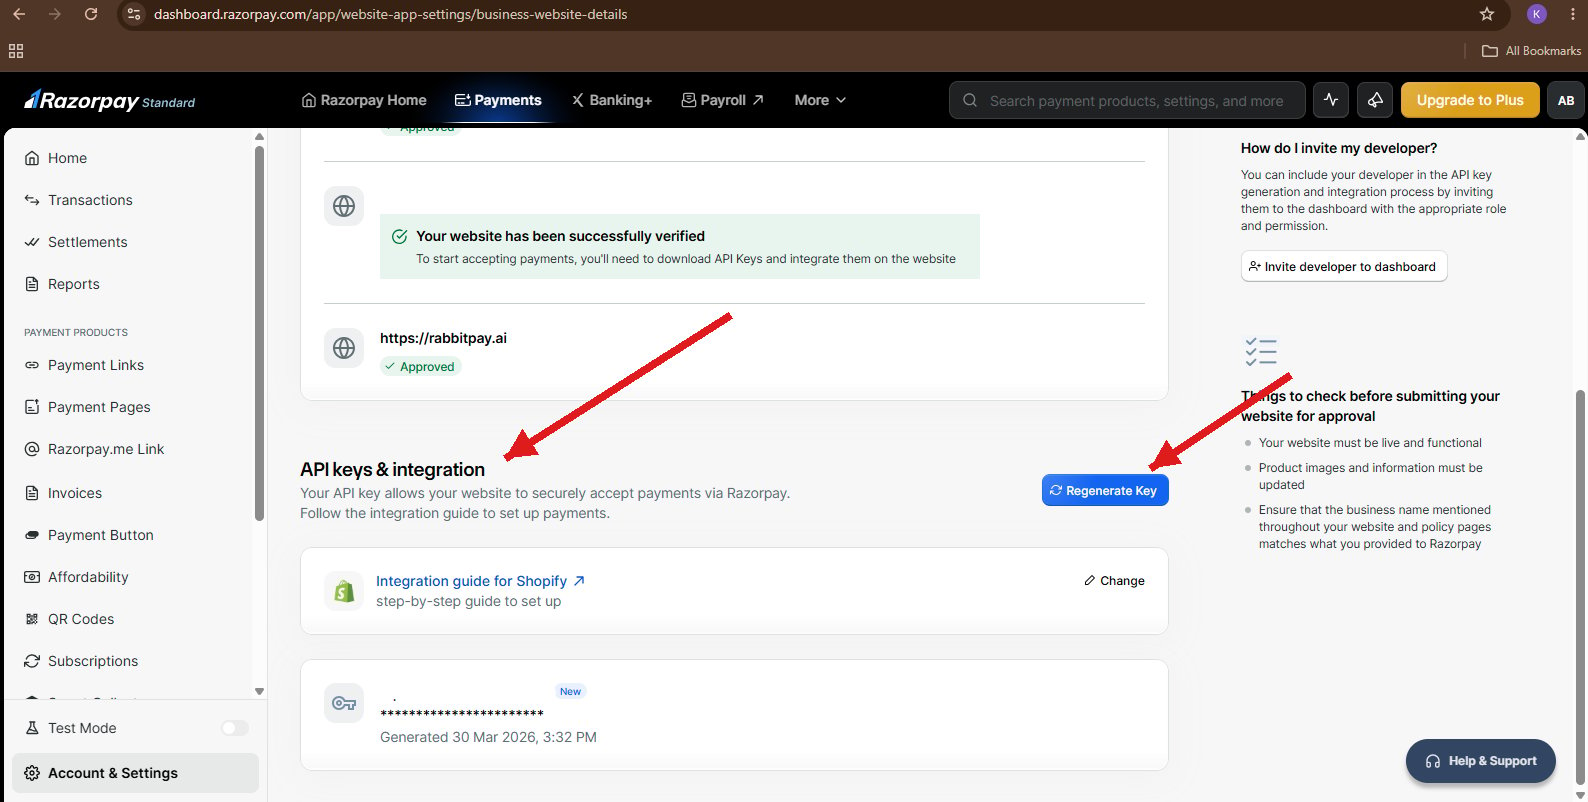
Once you are inside the **API Keys & Integration** page, you will see the section that contains the credentials required to integrate Razorpay with RabbitPay.
* If API Keys have **already been generated**, you can continue using the existing **Key ID** and **Key Secret**.
* If you want to **rotate credentials** or have **lost access** to the previous secret, you can regenerate a new key pair using the **Regenerate Key** button.
## Step 3: Access API Keys & Integration
Once you are inside the **API Keys & Integration** page, you will see the section that contains the credentials required to integrate Razorpay with RabbitPay.
* If API Keys have **already been generated**, you can continue using the existing **Key ID** and **Key Secret**.
* If you want to **rotate credentials** or have **lost access** to the previous secret, you can regenerate a new key pair using the **Regenerate Key** button.
 Regenerating an API key will **immediately invalidate the previous Key Secret**. Any integrations still using the old credentials will stop working until they are updated.
## Step 4: Generate or Retrieve API Keys
Follow the steps below to generate or retrieve your Razorpay API credentials:
1. Locate the **API Keys & Integration** section on the Account & Settings page.
2. If API Keys already exist, use the existing **Key ID**.
3. If a new key pair is required, click **Regenerate Key**.
4. Confirm the action in the popup that appears.
5. Copy the newly generated **Key ID**.
6. Copy the **Key Secret immediately** — Razorpay displays this value only once.
Store both the **Key ID** and **Key Secret** in a password manager or secrets vault. You will paste them into the RabbitPay dashboard in the next step of the integration.
## Important Notes
**Security best practices for handling Razorpay API credentials:**
* Store the **API Key** and **Secret** securely in an encrypted vault or environment variable.
* **Never share the Key Secret publicly** — treat it like a password.
* Do **not** expose API credentials in frontend applications, mobile apps, or public code repositories.
* If the **Key Secret is lost**, generate a new key pair — it cannot be recovered.
* Rotate your API keys periodically as part of your security hygiene.
## Verification
Your setup is complete when all of the following are true:
* ✅ A Razorpay API Key has been generated successfully.
* ✅ The **Key ID** has been copied and stored securely.
* ✅ The **Key Secret** has been copied and stored securely.
* ✅ The credentials are ready to be configured inside the RabbitPay dashboard.
## Next Steps
With your Razorpay API credentials ready, continue the integration by configuring webhooks so RabbitPay can receive real-time payment events from Razorpay.
Set up the webhook endpoint and signing secret to receive Razorpay payment events in RabbitPay.
Regenerating an API key will **immediately invalidate the previous Key Secret**. Any integrations still using the old credentials will stop working until they are updated.
## Step 4: Generate or Retrieve API Keys
Follow the steps below to generate or retrieve your Razorpay API credentials:
1. Locate the **API Keys & Integration** section on the Account & Settings page.
2. If API Keys already exist, use the existing **Key ID**.
3. If a new key pair is required, click **Regenerate Key**.
4. Confirm the action in the popup that appears.
5. Copy the newly generated **Key ID**.
6. Copy the **Key Secret immediately** — Razorpay displays this value only once.
Store both the **Key ID** and **Key Secret** in a password manager or secrets vault. You will paste them into the RabbitPay dashboard in the next step of the integration.
## Important Notes
**Security best practices for handling Razorpay API credentials:**
* Store the **API Key** and **Secret** securely in an encrypted vault or environment variable.
* **Never share the Key Secret publicly** — treat it like a password.
* Do **not** expose API credentials in frontend applications, mobile apps, or public code repositories.
* If the **Key Secret is lost**, generate a new key pair — it cannot be recovered.
* Rotate your API keys periodically as part of your security hygiene.
## Verification
Your setup is complete when all of the following are true:
* ✅ A Razorpay API Key has been generated successfully.
* ✅ The **Key ID** has been copied and stored securely.
* ✅ The **Key Secret** has been copied and stored securely.
* ✅ The credentials are ready to be configured inside the RabbitPay dashboard.
## Next Steps
With your Razorpay API credentials ready, continue the integration by configuring webhooks so RabbitPay can receive real-time payment events from Razorpay.
Set up the webhook endpoint and signing secret to receive Razorpay payment events in RabbitPay.