> ## Documentation Index
> Fetch the complete documentation index at: https://docs.rabbitpay.ai/llms.txt
> Use this file to discover all available pages before exploring further.
# Configure Razorpay Webhook
> Configure the Razorpay webhook so RabbitPay receives real-time payment updates.
## Overview
RabbitPay relies on **Razorpay Webhooks** to receive real-time payment notifications. These notifications allow RabbitPay to automatically synchronize **payment statuses, orders, subscriptions, and QR transactions** without requiring manual intervention.
Whenever an event occurs on Razorpay — such as a payment being captured, an order being updated, a subscription renewing, or a QR payment being received — Razorpay sends a signed HTTP request to the RabbitPay webhook endpoint. RabbitPay verifies the signature and updates the corresponding merchant record instantly.
Configuring the webhook correctly is **mandatory** before merchants can start accepting payments through RabbitPay. Without a valid webhook, payment and order statuses will not sync.
## Prerequisites
Before proceeding, ensure the following:
* An **active Razorpay Business Account**.
* **Administrator access** to the Razorpay Dashboard.
* Razorpay **API Keys** have already been generated. See [Generate Razorpay API Token](/integrations/razorpay/generate-api-token).
* **RabbitPay onboarding** has been initiated.
## Step 1: Navigate to Webhooks
From the Razorpay Dashboard, follow this path to reach the Webhooks configuration screen:
```text Navigation theme={null}
Razorpay Dashboard
↓
Account & Settings
↓
Website and App Settings
↓
Webhooks
```
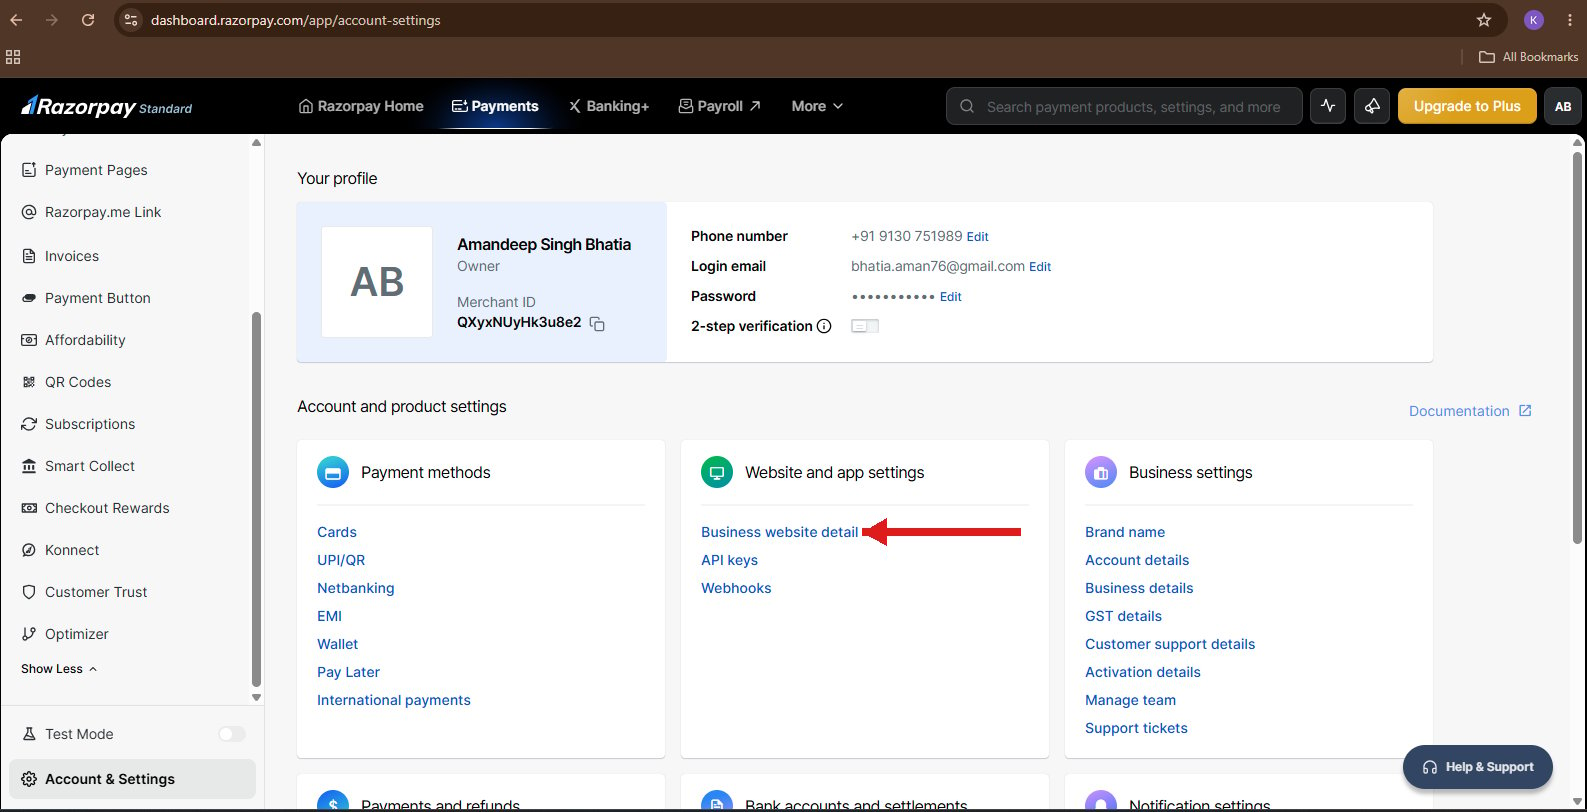
Log in to the [Razorpay Dashboard](https://dashboard.razorpay.com/) and click **Account & Settings** in the left sidebar.
Scroll to the **Website and app settings** card in the Account and product settings section.
Click the **Webhooks** link inside the Website and app settings card to open the Webhooks page.
 ## Step 2: Create a New Webhook
On the Webhooks page:
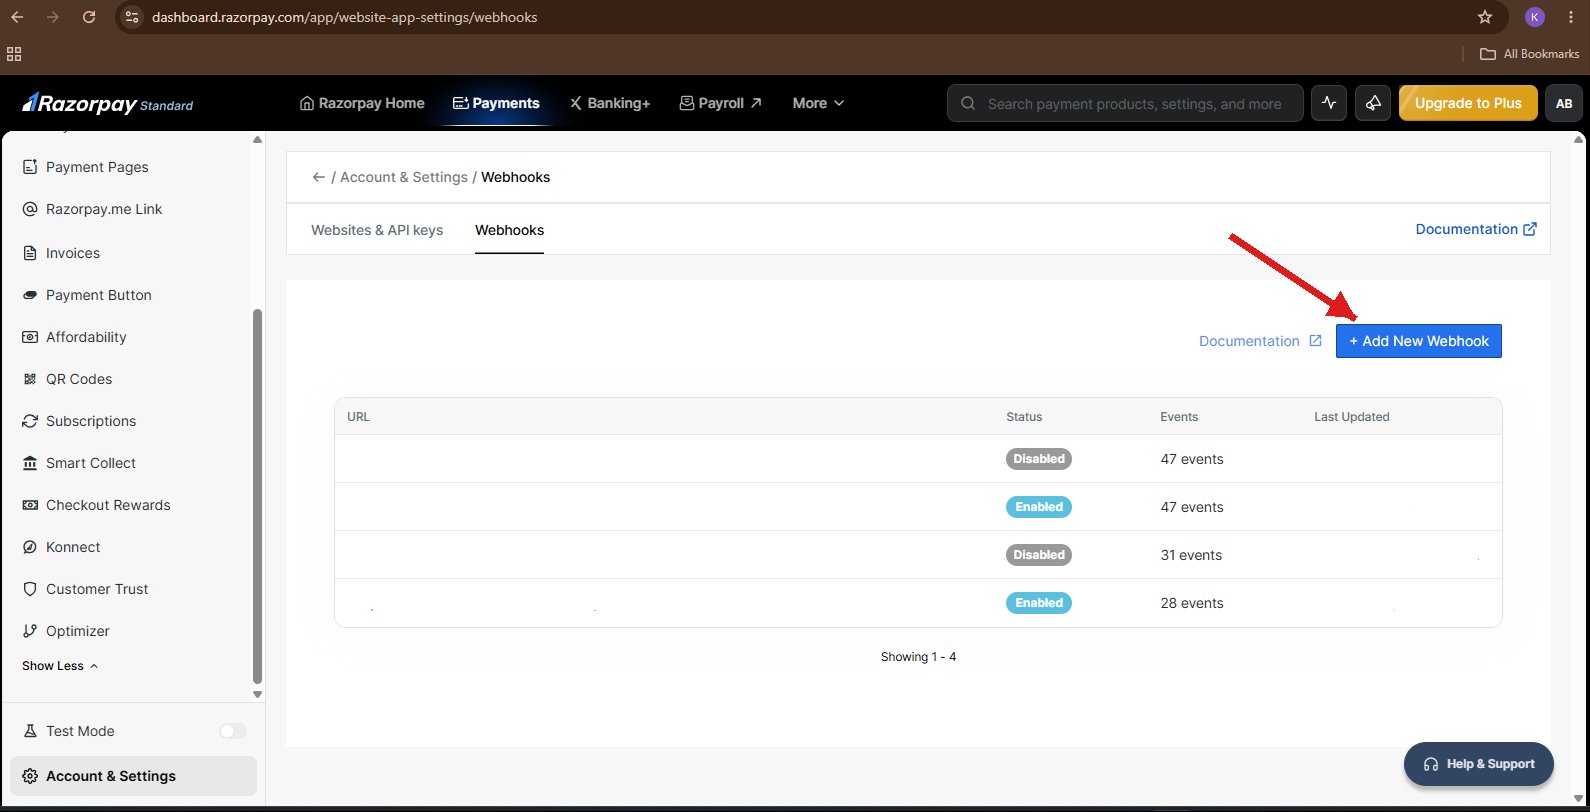
1. Click **+ Add New Webhook** in the top-right corner.
2. The **Webhook Setup** dialog will open.
A webhook endpoint must be created so Razorpay can securely send event notifications to RabbitPay. Each webhook maps a specific URL to a set of events that Razorpay will deliver.
## Step 2: Create a New Webhook
On the Webhooks page:
1. Click **+ Add New Webhook** in the top-right corner.
2. The **Webhook Setup** dialog will open.
A webhook endpoint must be created so Razorpay can securely send event notifications to RabbitPay. Each webhook maps a specific URL to a set of events that Razorpay will deliver.
 ## Step 3: Configure the Webhook
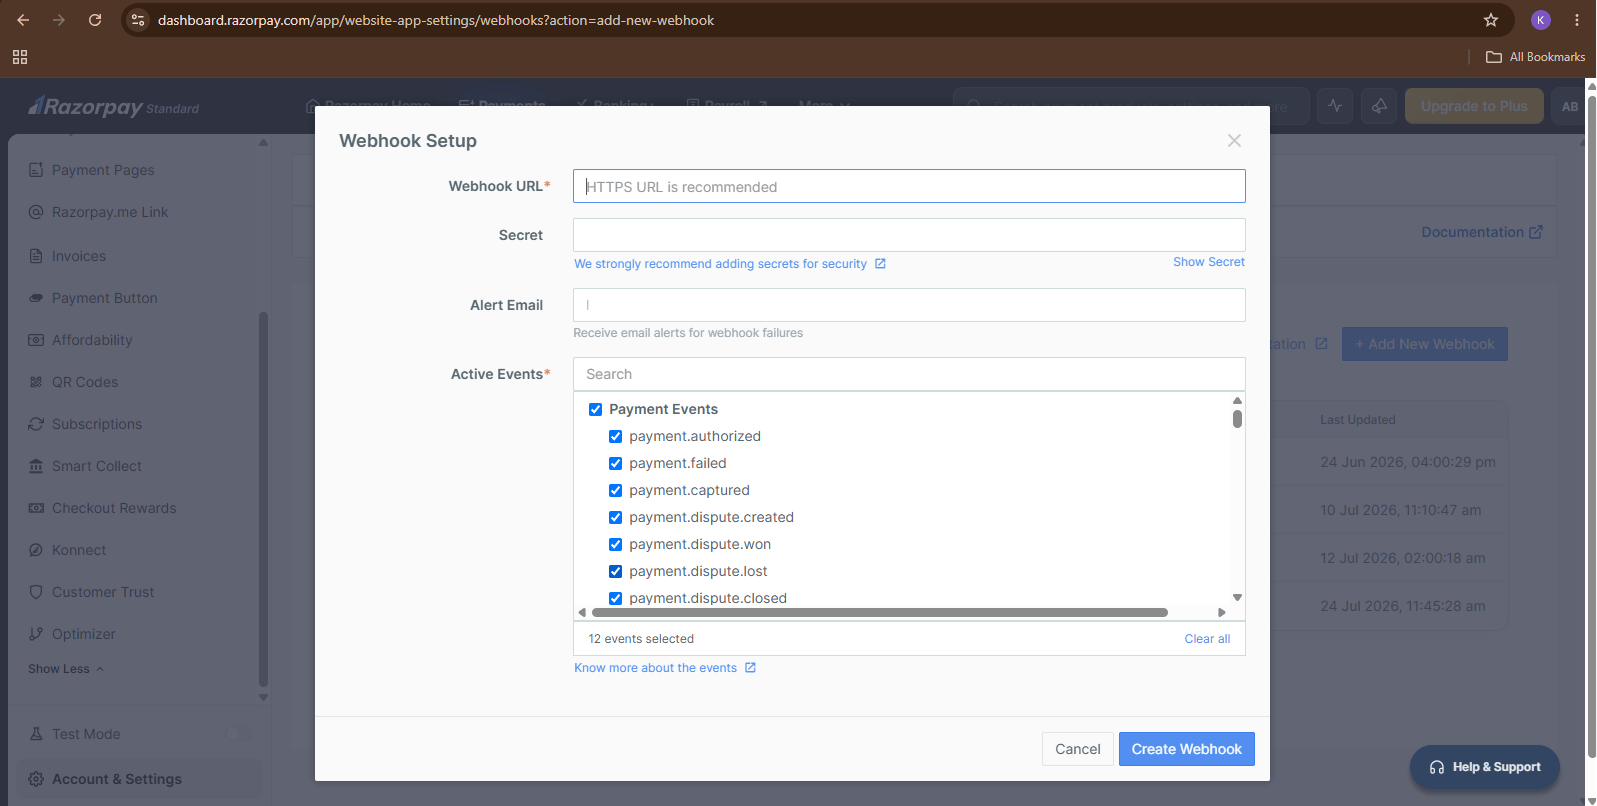
Complete the **Webhook Setup** form using the values below.
### Webhook URL
Copy and paste the following URL into the **Webhook URL** field.
```text Webhook URL theme={null}
https://dashboard.rabbitpay.ai/api/razorpay/webhook
```
This endpoint is used by RabbitPay to receive all webhook events from Razorpay. It is served over HTTPS and validates every incoming request.
### Secret
Enter the following value into the **Secret** field.
```text Webhook Secret theme={null}
rabbit@321
```
The webhook secret is used to verify that every webhook request originates from Razorpay. RabbitPay uses this secret to compute an HMAC signature and compare it against the `X-Razorpay-Signature` header on every incoming request.
### Alert Email
This field is **optional**.
Merchants may enter an email address if they wish to receive notifications whenever webhook delivery fails. This is useful for monitoring the health of the webhook integration.
### Active Events
Under **Active Events**, select **all events** from the following categories:
* **Payment Events**
* **Order Events**
* **Subscription Events**
* **QR Events**
Expand each category and ensure **every available event** within these four categories is selected.
Do **not** deselect any events within these four categories. RabbitPay requires every event so that payment creation, payment capture, order updates, subscription activities, and QR payment events are synchronized correctly. Missing events will cause order or payment desynchronization on the merchant dashboard.
Includes events such as `payment.authorized`, `payment.failed`, `payment.captured`, `payment.dispute.created`, `payment.dispute.won`, `payment.dispute.lost`, `payment.dispute.closed`, and all other events listed under **Payment Events**. Select every event in this category.
Includes events such as `order.paid` and all other events listed under **Order Events**. Select every event in this category.
Includes events such as `subscription.activated`, `subscription.charged`, `subscription.completed`, `subscription.updated`, `subscription.pending`, `subscription.halted`, `subscription.cancelled`, `subscription.paused`, `subscription.resumed`, and every other event listed under **Subscription Events**. Select every event in this category.
Includes events such as `qr_code.created`, `qr_code.closed`, `qr_code.credited`, and every other event listed under **QR Events**. Select every event in this category.
## Step 3: Configure the Webhook
Complete the **Webhook Setup** form using the values below.
### Webhook URL
Copy and paste the following URL into the **Webhook URL** field.
```text Webhook URL theme={null}
https://dashboard.rabbitpay.ai/api/razorpay/webhook
```
This endpoint is used by RabbitPay to receive all webhook events from Razorpay. It is served over HTTPS and validates every incoming request.
### Secret
Enter the following value into the **Secret** field.
```text Webhook Secret theme={null}
rabbit@321
```
The webhook secret is used to verify that every webhook request originates from Razorpay. RabbitPay uses this secret to compute an HMAC signature and compare it against the `X-Razorpay-Signature` header on every incoming request.
### Alert Email
This field is **optional**.
Merchants may enter an email address if they wish to receive notifications whenever webhook delivery fails. This is useful for monitoring the health of the webhook integration.
### Active Events
Under **Active Events**, select **all events** from the following categories:
* **Payment Events**
* **Order Events**
* **Subscription Events**
* **QR Events**
Expand each category and ensure **every available event** within these four categories is selected.
Do **not** deselect any events within these four categories. RabbitPay requires every event so that payment creation, payment capture, order updates, subscription activities, and QR payment events are synchronized correctly. Missing events will cause order or payment desynchronization on the merchant dashboard.
Includes events such as `payment.authorized`, `payment.failed`, `payment.captured`, `payment.dispute.created`, `payment.dispute.won`, `payment.dispute.lost`, `payment.dispute.closed`, and all other events listed under **Payment Events**. Select every event in this category.
Includes events such as `order.paid` and all other events listed under **Order Events**. Select every event in this category.
Includes events such as `subscription.activated`, `subscription.charged`, `subscription.completed`, `subscription.updated`, `subscription.pending`, `subscription.halted`, `subscription.cancelled`, `subscription.paused`, `subscription.resumed`, and every other event listed under **Subscription Events**. Select every event in this category.
Includes events such as `qr_code.created`, `qr_code.closed`, `qr_code.credited`, and every other event listed under **QR Events**. Select every event in this category.
 ## Step 4: Create the Webhook
After verifying the configuration:
Confirm the URL is exactly `https://dashboard.rabbitpay.ai/api/razorpay/webhook` with no trailing spaces.
Confirm the secret matches `rabbit@321` character-for-character.
Confirm that **all** events under Payment Events, Order Events, Subscription Events, and QR Events are selected.
Click the **Create Webhook** button at the bottom-right of the dialog.
Once created, Razorpay will begin sending webhook events to RabbitPay immediately.
## Verification
The webhook configuration is complete when:
* The webhook appears in the **Webhooks list** on the Razorpay Dashboard.
* The status is **Enabled**.
* The **RabbitPay webhook URL** (`https://dashboard.rabbitpay.ai/api/razorpay/webhook`) is displayed.
* The configured webhook shows the **selected events** count matching the total across the four required categories.
* **No validation errors** are displayed.
After the webhook is created, RabbitPay automatically detects the incoming events and marks the merchant's Razorpay integration as **Active**. If the merchant dashboard does not reflect this within a few minutes, verify that the URL and secret were entered exactly as documented above.
## Next Steps
Configure the Razorpay QR code so RabbitPay can accept UPI QR payments.
Connect your Shopify store to RabbitPay and enable 1-Click Checkout.
## Step 4: Create the Webhook
After verifying the configuration:
Confirm the URL is exactly `https://dashboard.rabbitpay.ai/api/razorpay/webhook` with no trailing spaces.
Confirm the secret matches `rabbit@321` character-for-character.
Confirm that **all** events under Payment Events, Order Events, Subscription Events, and QR Events are selected.
Click the **Create Webhook** button at the bottom-right of the dialog.
Once created, Razorpay will begin sending webhook events to RabbitPay immediately.
## Verification
The webhook configuration is complete when:
* The webhook appears in the **Webhooks list** on the Razorpay Dashboard.
* The status is **Enabled**.
* The **RabbitPay webhook URL** (`https://dashboard.rabbitpay.ai/api/razorpay/webhook`) is displayed.
* The configured webhook shows the **selected events** count matching the total across the four required categories.
* **No validation errors** are displayed.
After the webhook is created, RabbitPay automatically detects the incoming events and marks the merchant's Razorpay integration as **Active**. If the merchant dashboard does not reflect this within a few minutes, verify that the URL and secret were entered exactly as documented above.
## Next Steps
Configure the Razorpay QR code so RabbitPay can accept UPI QR payments.
Connect your Shopify store to RabbitPay and enable 1-Click Checkout.