> ## Documentation Index
> Fetch the complete documentation index at: https://docs.rabbitpay.ai/llms.txt
> Use this file to discover all available pages before exploring further.
# Create a Cart for a Customer
> Create a customer cart directly using their mobile number or restore an existing abandoned checkout with RabbitPay.
RabbitPay lets merchants create a cart for a customer in two ways:
* Create a **new cart directly** using the customer's mobile number.
* Restore a cart from an **existing abandoned checkout**.
This is useful when a customer contacts your support team and needs help completing their purchase.
## Option 1: Create a New Cart Using a Mobile Number
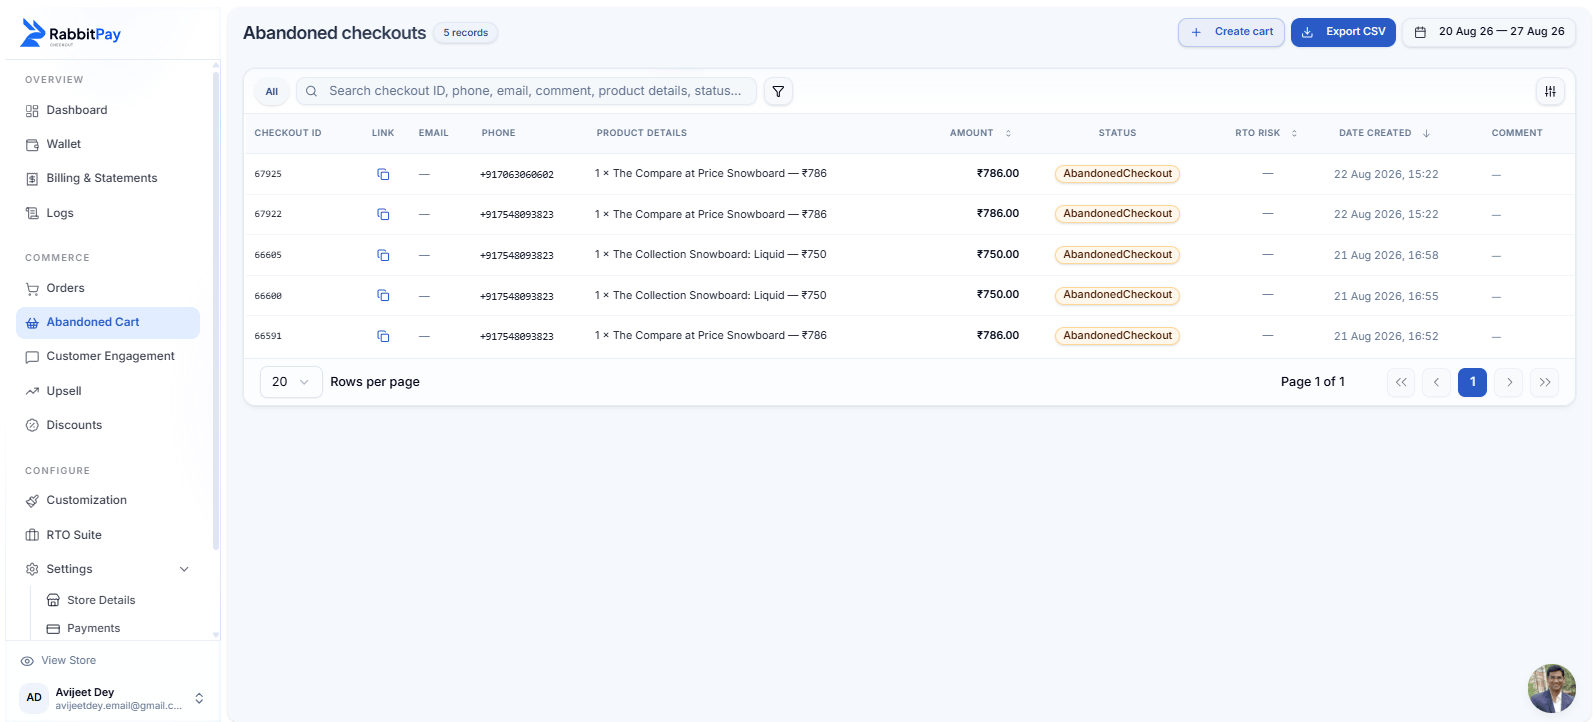
You can create a new cart directly from the **Abandoned Cart** page.
### Step 1: Open Abandoned Cart
1. Log in to your **RabbitPay Dashboard**.
2. Select **Abandoned Cart** from the left navigation.
3. Click **Create cart** in the top-right corner.
 ### Step 2: Enter the Customer's Mobile Number
The **Create cart** dialog will appear.
1. Enter the customer's mobile number.
2. Click **Continue**.
RabbitPay uses the mobile number to retrieve available customer information, including saved addresses and any in-progress checkout.
### Step 2: Enter the Customer's Mobile Number
The **Create cart** dialog will appear.
1. Enter the customer's mobile number.
2. Click **Continue**.
RabbitPay uses the mobile number to retrieve available customer information, including saved addresses and any in-progress checkout.
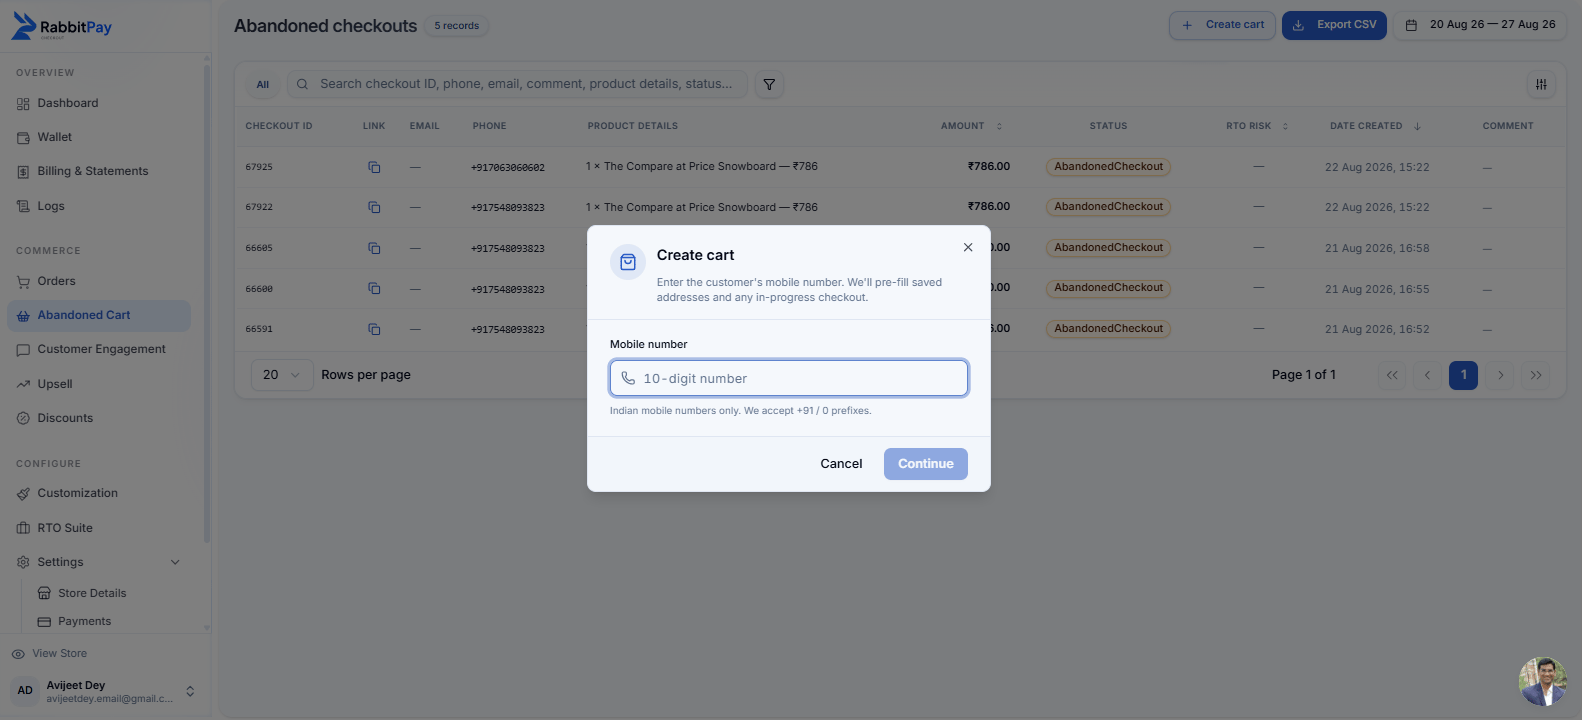 RabbitPay accepts Indian mobile numbers with a +91 or 0 prefix.
***
## Create New Cart
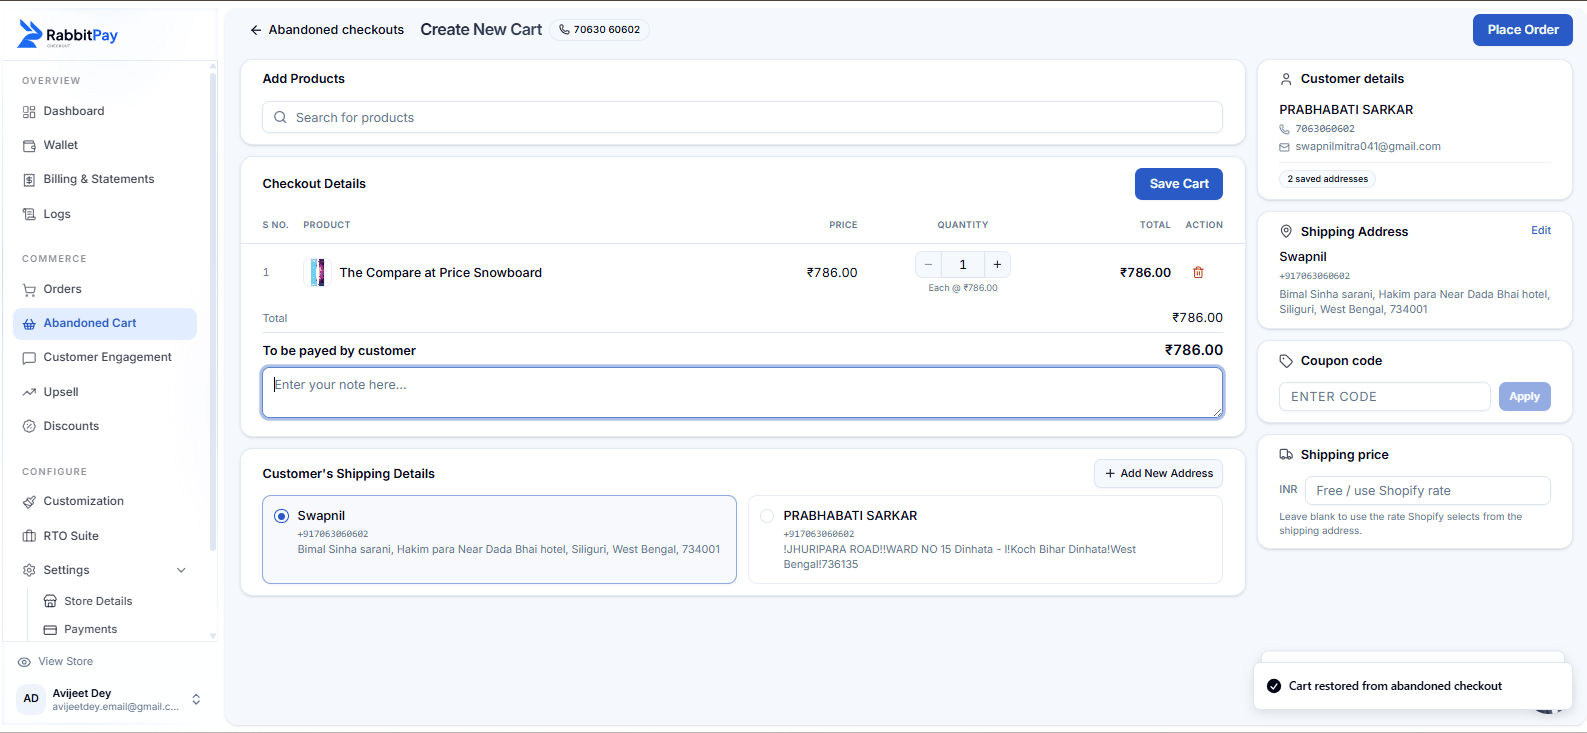
After entering the customer's mobile number, RabbitPay opens the **Create New Cart** page.
This page allows the merchant to build and configure the customer's order before placing it.
RabbitPay accepts Indian mobile numbers with a +91 or 0 prefix.
***
## Create New Cart
After entering the customer's mobile number, RabbitPay opens the **Create New Cart** page.
This page allows the merchant to build and configure the customer's order before placing it.
 ### Add Products
Use the **Search for products** field to find and add products to the cart.
Once a product is added, you can review:
* Product name
* Price
* Quantity
* Total amount
You can also increase or decrease the product quantity or remove a product from the cart.
### Checkout Details
The **Checkout Details** section shows the products currently added to the cart.
You can review the order total before saving or placing the order.
You can also add a **note** for the order using the note field.
### Customer Details
The **Customer details** section displays the customer's available information, including:
* Customer name
* Mobile number
* Email address
* Number of saved addresses
RabbitPay retrieves this information using the customer's mobile number.
### Shipping Address
The merchant can select the customer's available shipping address.
If the customer has multiple saved addresses, select the appropriate address for the order.
You can also:
* **Edit** an existing address.
* **Add New Address** if the required address is not already saved.
### Coupon Code
Merchants can apply a discount to the cart using the **Coupon code** field.
1. Enter the customer's coupon code.
2. Click **Apply**.
3. The applicable discount is reflected in the order total.
### Shipping Price
Merchants can configure the shipping charge for the order.
Enter a shipping amount in the **Shipping price** field.
You can also leave the field blank to use the shipping rate selected by Shopify for the customer's shipping address.
Shipping rates depend on the shipping configuration available for the Shopify store.
***
## Save or Place the Order
After reviewing the cart details, customer information, shipping address, and pricing:
* Select **Save Cart** to save the cart for later.
* Select **Place Order** to proceed with the order.
RabbitPay confirms when the cart has been successfully restored or created.
***
## Option 2: Create a Cart from an Existing Abandoned Checkout
If the customer already has an abandoned checkout, you can create a cart directly from that checkout.
### Step 1: Open the Abandoned Checkout
1. Go to **Abandoned Cart**.
2. Find the customer's abandoned checkout.
3. Click the checkout to open its details.
### Add Products
Use the **Search for products** field to find and add products to the cart.
Once a product is added, you can review:
* Product name
* Price
* Quantity
* Total amount
You can also increase or decrease the product quantity or remove a product from the cart.
### Checkout Details
The **Checkout Details** section shows the products currently added to the cart.
You can review the order total before saving or placing the order.
You can also add a **note** for the order using the note field.
### Customer Details
The **Customer details** section displays the customer's available information, including:
* Customer name
* Mobile number
* Email address
* Number of saved addresses
RabbitPay retrieves this information using the customer's mobile number.
### Shipping Address
The merchant can select the customer's available shipping address.
If the customer has multiple saved addresses, select the appropriate address for the order.
You can also:
* **Edit** an existing address.
* **Add New Address** if the required address is not already saved.
### Coupon Code
Merchants can apply a discount to the cart using the **Coupon code** field.
1. Enter the customer's coupon code.
2. Click **Apply**.
3. The applicable discount is reflected in the order total.
### Shipping Price
Merchants can configure the shipping charge for the order.
Enter a shipping amount in the **Shipping price** field.
You can also leave the field blank to use the shipping rate selected by Shopify for the customer's shipping address.
Shipping rates depend on the shipping configuration available for the Shopify store.
***
## Save or Place the Order
After reviewing the cart details, customer information, shipping address, and pricing:
* Select **Save Cart** to save the cart for later.
* Select **Place Order** to proceed with the order.
RabbitPay confirms when the cart has been successfully restored or created.
***
## Option 2: Create a Cart from an Existing Abandoned Checkout
If the customer already has an abandoned checkout, you can create a cart directly from that checkout.
### Step 1: Open the Abandoned Checkout
1. Go to **Abandoned Cart**.
2. Find the customer's abandoned checkout.
3. Click the checkout to open its details.
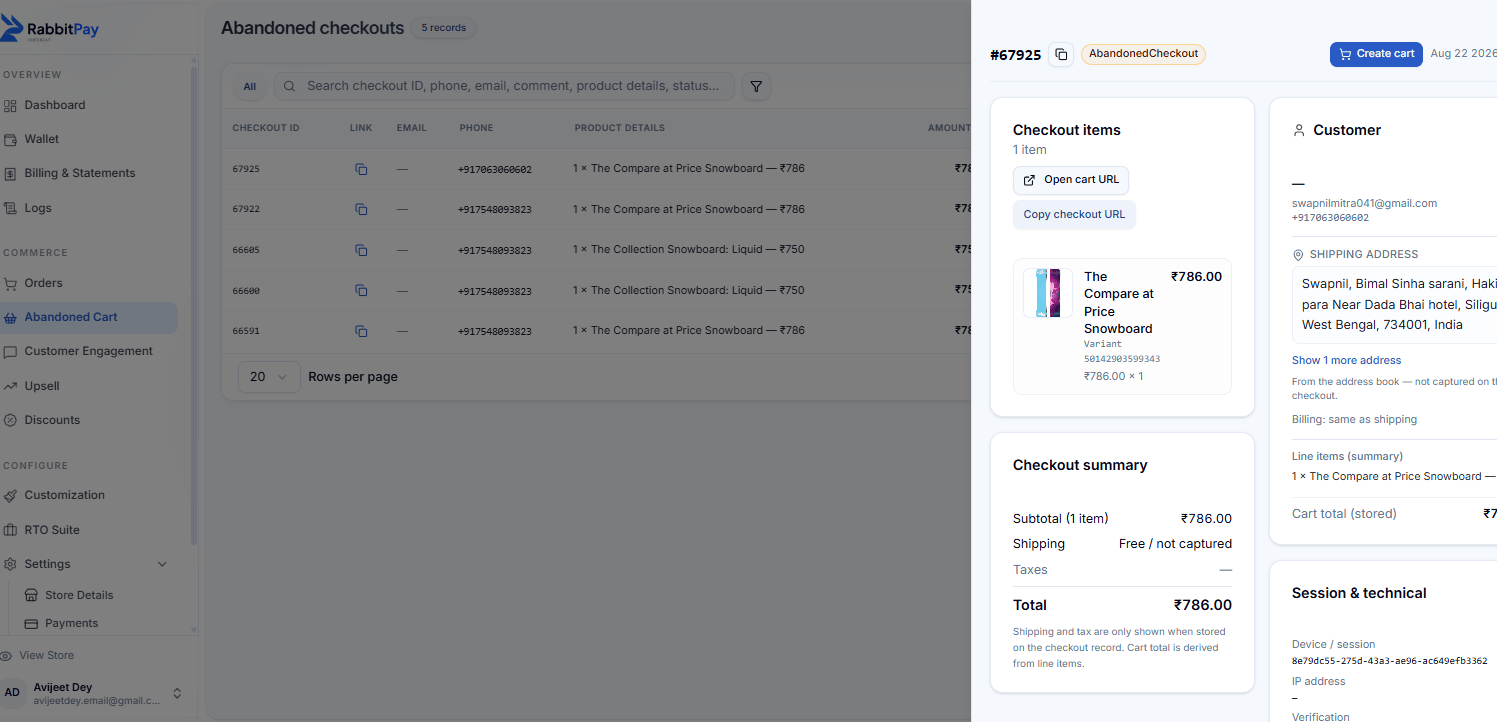
 ### Step 2: Select Create Cart
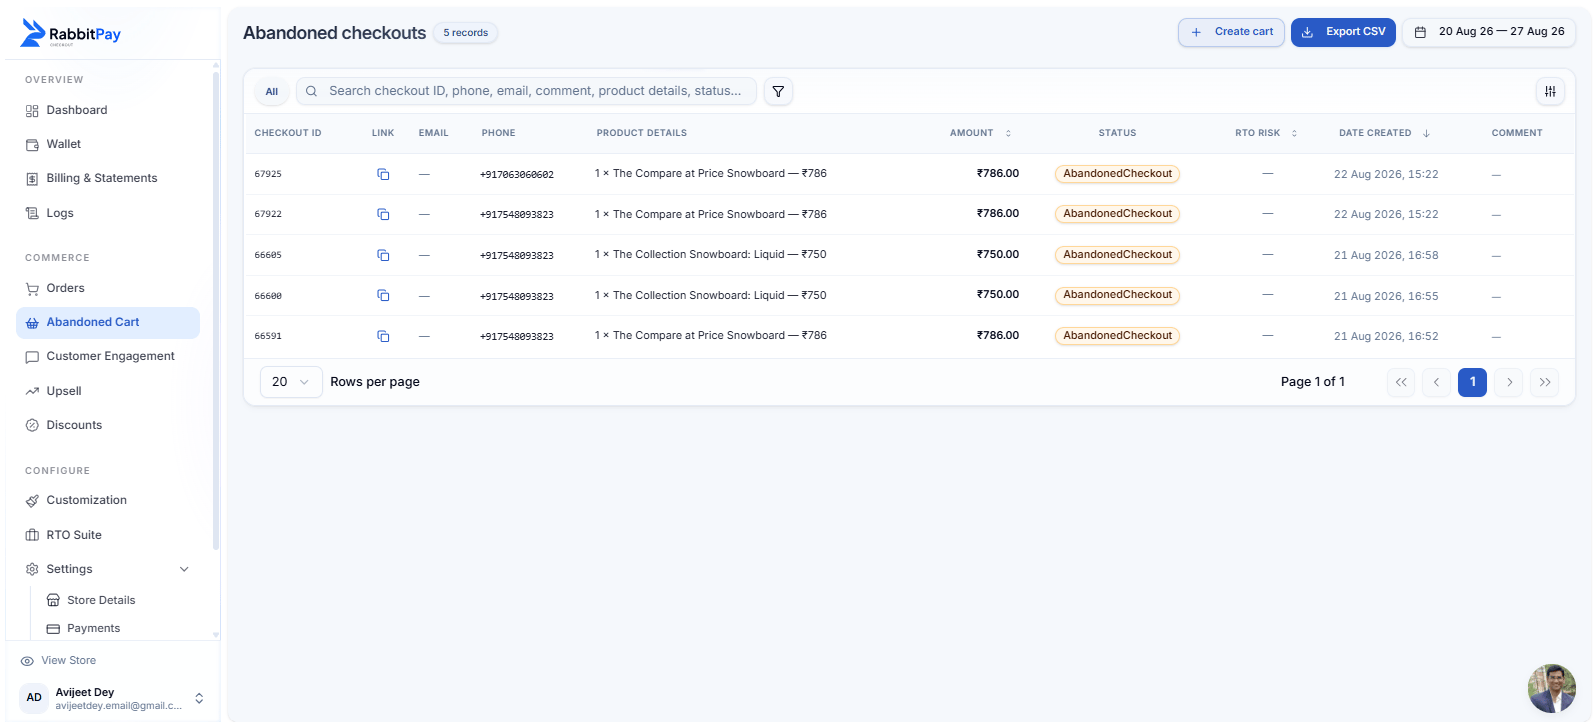
The checkout details panel displays the customer's information, products, and checkout total.
Click **Create cart**.
### Step 2: Select Create Cart
The checkout details panel displays the customer's information, products, and checkout total.
Click **Create cart**.
 RabbitPay restores the available checkout information and opens the **Create New Cart** page.
You can then review or modify the cart before saving or placing the order.
***
## What Can Merchants Configure?
When creating a cart, merchants can manage the main order details from a single page:
Add products, change quantities, review prices, or remove products from the cart.
Review the customer's name, phone number, email address, and saved information.
Select a saved address, edit an address, or add a new shipping address.
Apply an eligible coupon code to the customer's cart.
Add a shipping charge or use the shipping rate configured in Shopify.
Add an internal note or additional information related to the order.
## Why Use Create Cart?
Help customers complete their purchase when they need assistance during checkout.
Restore abandoned checkout information instead of rebuilding the order manually.
Create and configure a customer's cart from the RabbitPay Dashboard.
Modify products, quantities, addresses, coupons, shipping, and notes before placing the order.
## Result
RabbitPay gives merchants a complete support-assisted ordering flow:
**Abandoned Cart → Create cart → Customer mobile number → Create New Cart**
or
**Abandoned Cart → Open abandoned checkout → Create cart → Create New Cart**
From the **Create New Cart** page, merchants can review and configure the order before saving the cart or placing the order.
RabbitPay restores the available checkout information and opens the **Create New Cart** page.
You can then review or modify the cart before saving or placing the order.
***
## What Can Merchants Configure?
When creating a cart, merchants can manage the main order details from a single page:
Add products, change quantities, review prices, or remove products from the cart.
Review the customer's name, phone number, email address, and saved information.
Select a saved address, edit an address, or add a new shipping address.
Apply an eligible coupon code to the customer's cart.
Add a shipping charge or use the shipping rate configured in Shopify.
Add an internal note or additional information related to the order.
## Why Use Create Cart?
Help customers complete their purchase when they need assistance during checkout.
Restore abandoned checkout information instead of rebuilding the order manually.
Create and configure a customer's cart from the RabbitPay Dashboard.
Modify products, quantities, addresses, coupons, shipping, and notes before placing the order.
## Result
RabbitPay gives merchants a complete support-assisted ordering flow:
**Abandoned Cart → Create cart → Customer mobile number → Create New Cart**
or
**Abandoned Cart → Open abandoned checkout → Create cart → Create New Cart**
From the **Create New Cart** page, merchants can review and configure the order before saving the cart or placing the order.